정말 단순한 작업을 하는 앱이거나 게임이 아닌 이상 대부분의 앱에서 내비게이션바를 쉽게 발견할 수 있을 것이다. 이번에 회사에서 작업하는 앱도 내비게이션 메뉴가 있어야 하는데 Material Component인 BottomNavigationView를 사용하였다.
BottomNavigationView | Android Developers
developer.android.com
내비게이션 메뉴를 직접 개발해 본 것은 처음이라, 이번에 알게 된 내용을 정리해 두는 것이 좋겠다고 생각되었다.
이 포스트에서는 아주 기본적인 사용법을 안내할 것이다.
기본 사용법

기본적인 구조는 NavigationView를 포함하는 Acitivity에서 메뉴를 선택할 때마다 그에 해당하는 Fragment로 전환(Transition)하는 것이다.
내비게이션 메뉴가 3개인 샘플 프로젝트를 한번 만들어보자.
(여기서는 기본적인 예시를 위해 안드로이드 스튜디오에서 제공하는 샘플 프로젝트를 사용하여 설명한다.)
그렇다면 우선적으로 필요한 것은 Activity 1개와 각 메뉴에 해당하는 Fragment 3개이다.
app의 build.gradle의 dependencies에 다음을 추가해준다.
implementation 'androidx.navigation:navigation-fragment:2.5.2'
implementation 'androidx.navigation:navigation-ui:2.5.2'
implementation 'com.google.android.material:material:{version}'
3째줄의 material은 아마 기본적으로 추가 되어있겠지만, 버전에 따라서 디자인이 다를 것이다. 참고로 나는 1.6.1을 사용했다.
activity_main.xml
<?xml version="1.0" encoding="utf-8"?>
<androidx.constraintlayout.widget.ConstraintLayout xmlns:android="http://schemas.android.com/apk/res/android"
    xmlns:app="http://schemas.android.com/apk/res-auto"
    android:id="@+id/container"
    android:layout_width="match_parent"
    android:layout_height="match_parent"
    android:paddingTop="?attr/actionBarSize">

    <com.google.android.material.bottomnavigation.BottomNavigationView
        android:id="@+id/nav_view"
        android:layout_width="0dp"
        android:layout_height="wrap_content"
        android:layout_marginStart="0dp"
        android:layout_marginEnd="0dp"
        android:background="?android:attr/windowBackground"
        app:layout_constraintBottom_toBottomOf="parent"
        app:layout_constraintLeft_toLeftOf="parent"
        app:layout_constraintRight_toRightOf="parent"
        app:menu="@menu/bottom_nav_menu" />

    <fragment
        android:id="@+id/nav_host_fragment_activity_main"
        android:name="androidx.navigation.fragment.NavHostFragment"
        android:layout_width="match_parent"
        android:layout_height="match_parent"
        app:defaultNavHost="true"
        app:layout_constraintBottom_toTopOf="@id/nav_view"
        app:layout_constraintLeft_toLeftOf="parent"
        app:layout_constraintRight_toRightOf="parent"
        app:layout_constraintTop_toTopOf="parent"
        app:navGraph="@navigation/mobile_navigation" />

</androidx.constraintlayout.widget.ConstraintLayout>
material의 BottomNavigationView가 내비게이션 바이고 fragment가 해당 메뉴 화면이 표시되는 부분이다.
(이 정도는 다들 어렵지 않죠?)
여기서 자세히 봐야할 속성이 2가지 있다.
- BottomNavigationView의 app:menu 값 => 메뉴 아이템을 정의하는 리소스 파일
- fragment의 app:navGraph 값 => fragment 매칭 및 navigation 속성을 정의하는 리소스 파일
그냥 글로 봤을 때는 이게 뭔 소리인가 싶을 것이다.
백문이 불여일견이라고 리소스 파일의 코드를 한 번 보자.
bottom_nav_menu는 res 하단에 menu라는 리소스 패키지를 추가하고 그 안에 해당 파일을 생성한다.
mobile_navigation은 res 하단에 navigation이라는 리소스 패키지를 추가하고 그 안에 해당 파일을 생성한다.
즉, res/menu/bottom_nav_menu.xml과 res/navigation/mobile_navigation.xml이 추가된 것이다.
bottom_nav_menu.xml
<?xml version="1.0" encoding="utf-8"?>
<menu xmlns:android="http://schemas.android.com/apk/res/android">

    <item
        android:id="@+id/navigation_home"
        android:icon="@drawable/ic_home_black_24dp"
        android:title="@string/title_home" />

    <item
        android:id="@+id/navigation_dashboard"
        android:icon="@drawable/ic_dashboard_black_24dp"
        android:title="@string/title_dashboard" />

    <item
        android:id="@+id/navigation_notifications"
        android:icon="@drawable/ic_notifications_black_24dp"
        android:title="@string/title_notifications" />

</menu>
메뉴 아이템을 추가하는 부분이다.
mobile_navigation.xml
<?xml version="1.0" encoding="utf-8"?>
<navigation xmlns:android="http://schemas.android.com/apk/res/android"
    xmlns:app="http://schemas.android.com/apk/res-auto"
    xmlns:tools="http://schemas.android.com/tools"
    android:id="@+id/mobile_navigation"
    app:startDestination="@+id/navigation_home">

    <fragment
        android:id="@+id/navigation_home"
        android:name="com.example.bottomnavex.ui.home.HomeFragment"
        android:label="@string/title_home"
        tools:layout="@layout/fragment_home" />

    <fragment
        android:id="@+id/navigation_dashboard"
        android:name="com.example.bottomnavex.ui.dashboard.DashboardFragment"
        android:label="@string/title_dashboard"
        tools:layout="@layout/fragment_dashboard" />

    <fragment
        android:id="@+id/navigation_notifications"
        android:name="com.example.bottomnavex.ui.notifications.NotificationsFragment"
        android:label="@string/title_notifications"
        tools:layout="@layout/fragment_notifications" />
</navigation>
navigation의 fragment를 설정해주는 파일이다.
navigation 태그의 app:startDestination에 시작 프래그먼트를 지정한다.
각 fragment 태그에 해당하는 fragment의 layout을 지정한다.
Design 탭을 확인하면,

위와 같이 3개의 아이템이 잘 추가된 것을 확인할 수 있다.
그러면 이제 java 코드를 작성할 차례이다.
MainActivity.java
import android.os.Bundle;

import com.google.android.material.bottomnavigation.BottomNavigationView;

import androidx.appcompat.app.AppCompatActivity;
import androidx.navigation.NavController;
import androidx.navigation.Navigation;
import androidx.navigation.ui.AppBarConfiguration;
import androidx.navigation.ui.NavigationUI;

import com.songworld.bottomnavex.databinding.ActivityMainBinding;

public class MainActivity extends AppCompatActivity {

    private ActivityMainBinding binding;

    @Override
    protected void onCreate(Bundle savedInstanceState) {
        super.onCreate(savedInstanceState);

        binding = ActivityMainBinding.inflate(getLayoutInflater());
        setContentView(binding.getRoot());

        BottomNavigationView navView = findViewById(R.id.nav_view);
        // Passing each menu ID as a set of Ids because each
        // menu should be considered as top level destinations.
        AppBarConfiguration appBarConfiguration = new AppBarConfiguration.Builder(
                R.id.navigation_home, R.id.navigation_dashboard, R.id.navigation_notifications)
                .build();
        NavController navController = Navigation.findNavController(this, R.id.nav_host_fragment_activity_main);
        NavigationUI.setupActionBarWithNavController(this, navController, appBarConfiguration);
        NavigationUI.setupWithNavController(binding.navView, navController);
    }

}
appBarConfiguaration에 메뉴를 등록하고 build한다.
NavigationUI에 내비게이터와 해당 화면을 보여줄 fragment를 setup하면 완료!
이대로 실행하면
나같은 경우는 Material3 디자인을 적용하였다. 메뉴별로 해당하는 fragment로 자동전환되고 back 버튼을 누르면 home으로 돌아간다.
매우 쉽지 않은가? 이것이 기본적인 BottomNavigationView의 사용법이다.
Nested Navigation Graph
(중첩 내비게이션)
일반적으로 어떤 메뉴를 선택해서 들어갔을 때 그 깊이(depth)가 1인 경우는 거의 없다. 내가 profile 메뉴를 선택해서 들어갔는데, 그 fragment 안에 있는 어떤 버튼이나 이벤트로 인해 다른 창으로 이동해야하는 경우가 허다하다.
액티비티를 띄우면 bottomNavigationView가 가려지고 그냥 fragment를 대체하자니 fragment stack 관리를 또 해줘야 한다는 불편함이 있다.
해결 방법은 너무나 간단하다. 내비게이션 안에 또 내비게이션을 사용하면 된다.
이를 중첩 내비게이션이라고 하는데 java 코드를 작성할 일이 없고 xml에서 연결연결만 해주면 되니 굉장히 간단하고 유지보수도 쉽다!
우선 HomeFragment에 버튼 하나를 추가하고 이 버튼을 누르면 SecondHomeFragment가 보여지도록 하고 싶다고 하자.
필요한 SecondHomeFragment 관련 클래스를 추가하고
res/navigation/home.xml 을 새로 추가한다.
home.xml
<?xml version="1.0" encoding="utf-8"?>
<navigation xmlns:android="http://schemas.android.com/apk/res/android"
    xmlns:app="http://schemas.android.com/apk/res-auto"
    xmlns:tools="http://schemas.android.com/tools"
    android:id="@+id/home"
    app:startDestination="@+id/navigation_home">

    <fragment
        android:id="@+id/navigation_home"
        android:name="com.example.bottomnavex.ui.home.HomeFragment"
        android:label="@string/title_home"
        tools:layout="@layout/fragment_home">
        <action
            android:id="@+id/action_home"
            app:destination="@+id/navigation_secondhome" />
    </fragment>

    <fragment
        android:id="@+id/navigation_secondhome"
        android:name="com.example.bottomnavex.ui.home.SecondHomeFragment"
        android:label="SecondHome"
        tools:layout="@layout/fragment_secondhome" />

</navigation>
HomeFragment에 action을 추가한다.
이 action이 한 프래그먼트에서 다른 프래그먼트로 이동하는 액션을 취해준다. 이 기능 덕분에 우리가 코드에 하나하나 연결하는 작업을 해주지 않아도 된다.
여기서 중요한 것은 이 home.xml도 하나의 내비게이션이기 때문에 app:startDestination을 설정하여야 한다는 점이다. 우리는 HomeFragment에서 시작할 것이기 때문에 해당 아이디를 입력한다.
그리고 res/navigation/mobile_navigation.xml을 변경한다.
mobile_navigation.xml
<?xml version="1.0" encoding="utf-8"?>
<navigation xmlns:android="http://schemas.android.com/apk/res/android"
    xmlns:app="http://schemas.android.com/apk/res-auto"
    xmlns:tools="http://schemas.android.com/tools"
    android:id="@+id/mobile_navigation"
    app:startDestination="@id/home">

    <include app:graph="@navigation/home" />

    <fragment
        android:id="@+id/navigation_dashboard"
        android:name="com.example.bottomnavex.ui.dashboard.DashboardFragment"
        android:label="@string/title_dashboard"
        tools:layout="@layout/fragment_dashboard" />

    <fragment
        android:id="@+id/navigation_notifications"
        android:name="com.example.bottomnavex.ui.notifications.NotificationsFragment"
        android:label="@string/title_notifications"
        tools:layout="@layout/fragment_notifications" />
</navigation>
fragment 대신 include 를 사용하여 home.xml을 연결해준다.
또 중요한 것은 app:startDestination의 값이 @id/home으로 바뀌었다는 것이다. 바로 home.xml의 id 값이다.
또 하나 잊지 말아야 할 것은 바로 bottom_nav_menu.xml도 수정해야 한다는 점이다.
bottom_nav_menu.xml
<?xml version="1.0" encoding="utf-8"?>
<menu xmlns:android="http://schemas.android.com/apk/res/android">

    <item
        android:id="@+id/home"
        android:icon="@drawable/ic_home_black_24dp"
        android:title="@string/title_home" />

    <item
        android:id="@+id/navigation_dashboard"
        android:icon="@drawable/ic_dashboard_black_24dp"
        android:title="@string/title_dashboard" />

    <item
        android:id="@+id/navigation_notifications"
        android:icon="@drawable/ic_notifications_black_24dp"
        android:title="@string/title_notifications" />

</menu>
home 아이템의 id를 home.xml의 id로 수정한다.
그러면 Design 탭에는 다음과 같이 나온다.


마지막으로 HomeFragment에서 버튼에 이벤트를 주어 action을 실행하는 코드를 넣는다.
binding.button.setOnClickListener(new View.OnClickListener() {
    @Override
    public void onClick(View view) {
        NavHostFragment.findNavController(HomeFragment.this).navigate(R.id.action_home);
    }
});
이제 실행해보면,
다 잘되는데 마지막에 SecondHome에서 다시 Home으로 돌아오는 것이 안된다.
이는 ActionBar에 이벤트를 추가해주면 된다.
다시 MainActivity로 가서 NavController 부분을 다음과 같이 수정한다.
public class MainActivity extends AppCompatActivity {

    private ActivityMainBinding binding;
    private NavController navController;	// 멤버변수로 만들기

    @Override
    protected void onCreate(Bundle savedInstanceState) {
        super.onCreate(savedInstanceState);

        binding = ActivityMainBinding.inflate(getLayoutInflater());
        setContentView(binding.getRoot());

        BottomNavigationView navView = findViewById(R.id.nav_view);
        // Passing each menu ID as a set of Ids because each
        // menu should be considered as top level destinations.
        AppBarConfiguration appBarConfiguration = new AppBarConfiguration.Builder(
                R.id.navigation_home, R.id.navigation_dashboard, R.id.navigation_notifications)
                .build();

        // 앞에 타입 지우기
        navController = Navigation.findNavController(this, R.id.nav_host_fragment_activity_main);
        NavigationUI.setupActionBarWithNavController(this, navController, appBarConfiguration);
        NavigationUI.setupWithNavController(binding.navView, navController);
    }

    // NavigateUp하여 뒤로 다시 오는 이벤트
    @Override
    public boolean onSupportNavigateUp() {
        navController.navigateUp();
        return super.onSupportNavigateUp();
    }
}
짜잔
이렇게 중첩 내비게이션도 완성
UI 커스터마이징
대부분의 앱이 자신만의 디자인 스타일이 있기 때문에 기본 스타일에서 수정하여 사용하게 된다.
나는 디자인쪽 작업을 거의 안해봐서 여기서는 기본적인 수정사항만 다루도록 하겠다.
1. 글씨 없애기
app:labelVisibilityMode="unlabeled"activity_main.xml layout 의 BottomNavigationView 태그 안에 위 속성을 추가해주면 타이틀이 보이지 않는다.

2. 이미지를 넣었는데 제대로 나오지 않을 때
기본 디자인은 drawable을 등록하면 선택될 때와 아닐 때 tint를 줘서 색깔이 구분되게 한다. 그래서 일반 이미지를 넣었을 경우 모양은 잘 나와도 색깔이 전혀 구분되지 않게 나오는 경우가 있다.

나의 꿈틀이 이미지를 넣었다.

엥 근데 이렇게 모양만 보이고 색은 보이지 않는다. 이럴 때는
navView.setItemIconTintList(null);위 코드를 MainActivity에 추가해준다. 내비게이션 뷰의 icon에 tint 기능을 없애주는 것이다.

이제 이미지 색이 제대로 보인다.
그럼 선택될 때랑 선택되지 않았을 때 구분을 어떻게 하냐고?
다음 selector 등록하기로 해결한다.
3. selector 등록하기
우선 drawable에 선택했을 때와 선택하지 않았을 때의 이미지를 넣어준다. (이정도는 다 알쥬?)
그 후 drawable 폴더에서 오른쪽 마우스 클릭 - New - New Resource File을 선택하면 아래 화면이 나온다.
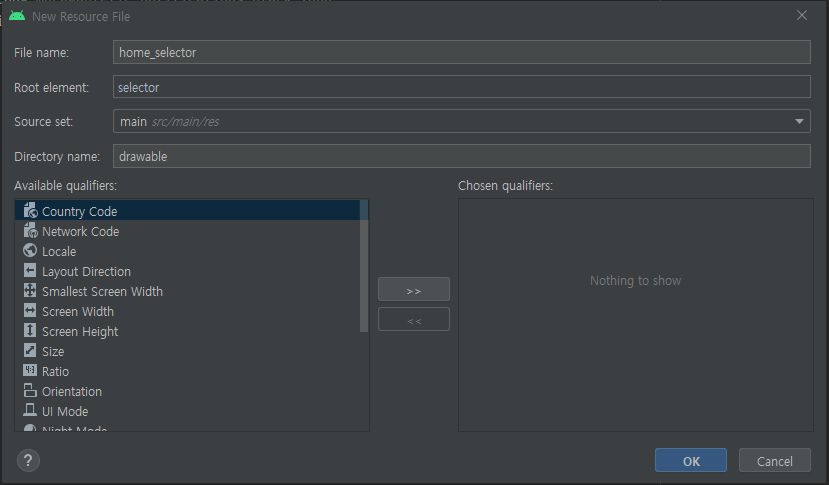
위와 같이 입력 후 OK를 선택한 후 내용은 다음과 같이 입력한다.
<?xml version="1.0" encoding="utf-8"?>
<selector xmlns:android="http://schemas.android.com/apk/res/android">
    <item android:state_checked="true" android:drawable="@drawable/koomtle"/>
    <item android:state_checked="false" android:drawable="@drawable/koomtle_gray"/>
</selector>
선택 값(true / false)에 따라서 나올 drawable을 설정한다.
이그리고 이 selector를 bottom_nav_menu.xml에 home의 icon으로 설정해준다.
<item
    android:id="@+id/home"
    android:icon="@drawable/home_selector"
    android:title="@string/title_home" />
그러면

위와 같이 선택되지 않았을 때 설정한 이미지가 나온다. 나 같은 경우는 그레이스케일 이미지를 추가하여 선택되지 않았을 때 그 이미지가 나오게 한 경우이다.
4. 선택된 메뉴 뒤 인디케이터 없애기
위 스크린샷들을 자세히 보면 선택된 메뉴 아이콘 뒤에 타원형처럼 생긴 살짝 더 진한 보라색이 보이는 것을 알 수 있다. 이 효과를 없애기 위해서는 MainAcitivity에 다음을 추가한다.
navView.setItemActiveIndicatorEnabled(false);그럼 다음과 같이 선택되어도 아이콘만 변화가 있을 뿐 뒤에 타원이 생기지 않는다.
이렇게 오늘 안드로이드의 BottomNavigationView를 공부해보았다.
이 글을 보시는 분들의 어려움이 조금이나마 해결되었기를 바란다.
'개발 관련 이야기' 카테고리의 다른 글
| Android - Fragment에서 Activity로 값 전달하기 (0) | 2022.11.27 |
|---|---|
| Android Navigation action 사용하기 (2) | 2022.10.30 |
| RecyclerView.Adapter 사용 시 앱 기본테마가 적용 안되는 문제 (0) | 2022.09.14 |
| Aparche Spark :: pyspark RDD를 이용하여 간단한 예제 풀어보기 (0) | 2022.09.12 |
| FaceNet 논문 리뷰 (0) | 2022.09.05 |


댓글